Difference between revisions of "Blender hints and tips"
| Line 1: | Line 1: | ||
| − | '''For information specific to using Blender in conjunction with IWTE for M2TW Battlemap Buildings please see [[Blender | + | '''For information specific to using Blender in conjunction with IWTE for M2TW Battlemap Buildings please see [[IWTE - Settlements in Blender]]. For information on working on RTW and M2TW Units or Characters in Blender see [[IWTE - Units in Blender]].''' |
This page consists of more general tips which may be suited to use of Blender for other aspects of Total War Modding. Information given is for Blender 2.8 unless otherwise noted. | This page consists of more general tips which may be suited to use of Blender for other aspects of Total War Modding. Information given is for Blender 2.8 unless otherwise noted. | ||
| + | |||
| + | ==Textures== | ||
| + | This explains one way of opening an image texture in Blender 2.92. In the right-hand side bar click the pink circular material icon. If 'Surface' is not visible, click the 'Use Nodes' button. In the 'Surface' drop down box select 'Principled BSDF'. Click the small round button next to 'Base Color' (not the main box), select 'Image Texture' from the drop down list. A new bar will open under Base Color, select the 'Open' tab and browse to your image file. | ||
| + | |||
| + | [[File:Texture-in-blender.jpg|How to open an image texture in Blender]] | ||
| + | |||
==Animated Models== | ==Animated Models== | ||
Revision as of 05:19, 29 March 2021
For information specific to using Blender in conjunction with IWTE for M2TW Battlemap Buildings please see IWTE - Settlements in Blender. For information on working on RTW and M2TW Units or Characters in Blender see IWTE - Units in Blender.
This page consists of more general tips which may be suited to use of Blender for other aspects of Total War Modding. Information given is for Blender 2.8 unless otherwise noted.
Contents
Textures
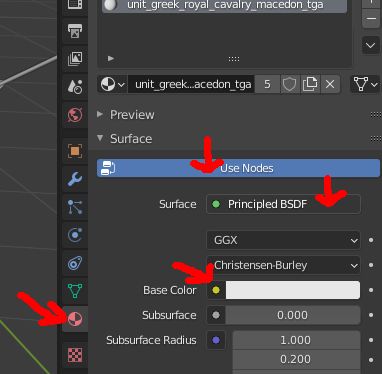
This explains one way of opening an image texture in Blender 2.92. In the right-hand side bar click the pink circular material icon. If 'Surface' is not visible, click the 'Use Nodes' button. In the 'Surface' drop down box select 'Principled BSDF'. Click the small round button next to 'Base Color' (not the main box), select 'Image Texture' from the drop down list. A new bar will open under Base Color, select the 'Open' tab and browse to your image file.
Animated Models
Bone Assignment
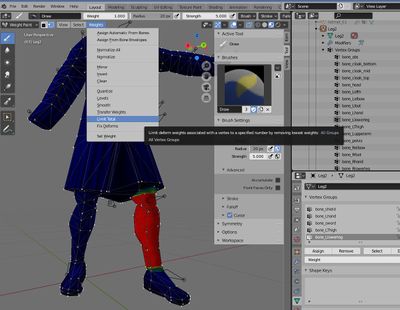
Assigning vertexes to bones is achieved by 'weight painting' in Blender. If you need to limit the number of bones a vertex is assigned to, e.g. to a single bone for M2TW strat characters or RTW units, you can use "Limit Total" under the "Weights" menu, input the number of bones desired in the drop-down mini-menu that appears. To get Vertex Groups applied to new/imported piece of mesh, first make the mesh a child of the Armature parent, using one of the "Assign from Bones" options. If the automated process didn't get the desired result select the vertex group bone name that you want to assign to, and 'paint' the vertexes.
Animations
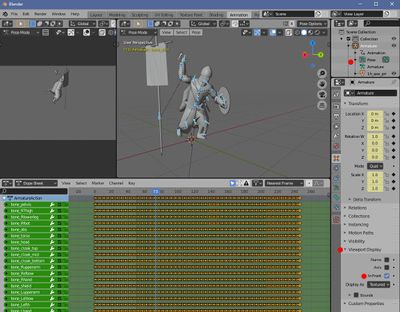
To start adjusting animations you need to be in "Pose Mode", to view the keyframes in the "Dope Sheet" section and be able to select bones easily, click the pose (running man) symbol in the side-bar, open "Viewport Display" and select "In Front".
Bone Constraints
Bones will generally follow the movements of their parent bone/s in the armature, to over-ride this behaviour, or temporarily change the parent relationship you can use "Bone Constraints" on individual bones.
You can impose a constraint only on certain keyframes by manipulating the "Influence" amount. 1.0 will give the constraint full influence and 0.0 will give no influence. To set for an individual keyframe, drag the blue time bar to the desired frame, type the desired number in the influence box then hover over the box and hit the shortcut key "i" to set that value. This can be used if you wish to have a weapon's bone linked to the hand bone for parts of the animation, but set down or stored against the torso for other parts.
Pictured below is an animation in .blend file with bone constraints applied.
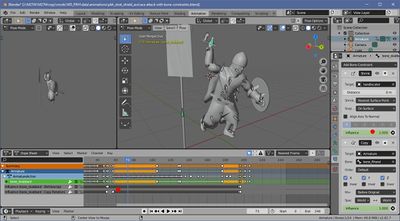
"Shrinkwrap" to a portion of mesh seems to be the only constraint that will make a bone follow acurately an element that isn't its parent in the armature. If you're exporting the animation separately you can temporarily separate a portion of mesh to provide a smaller area to wrap to.
Exporting via Collada will convert the movement paths obtained by the bone constraints to individual keyframe values (as shown in the picture under Animations above), that should then be useable in other programs that may not directly accept the constraint properties.
Export via Collada to .dae
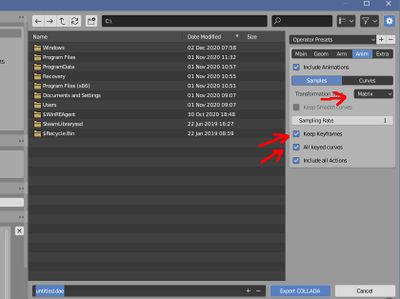
To ensure you save the frames for any bones that might be stationary but in a new pose position select the boxes shown below.
To suit processing by IWTE please use the "Matrix" export option as shown.
