Difference between revisions of "On-wall deployment - M2TW"
(→View Existing Deployment) |
m (→View Existing Deployment) |
||
| (6 intermediate revisions by 2 users not shown) | |||
| Line 1: | Line 1: | ||
{{M2TW Modding Logo}} | {{M2TW Modding Logo}} | ||
| − | In siege battles in [[Medieval II: Total War]] infantry can stand and fight on the flat wall surfaces around the perimeter of most settlements, forts and castles. | + | In siege battles in [[Medieval II: Total War]], infantry can stand and fight on the flat wall surfaces around the perimeter of most settlements, forts, and castles. This article explains the mechanics of this process and how to add your own on-wall deployment blocks with [[IWTE]]. |
| − | To date only infantry units can be deployed on walls | + | To date, only infantry units can be deployed on walls. Mods that purport to have artillery on walls have achieved the effect by having wide blocks of terrain hidden under a superficial 'wall' structure. |
==View Existing Deployment== | ==View Existing Deployment== | ||
| Line 11: | Line 11: | ||
| − | To view the on wall deployment of an existing settlement in [[IWTE]], ''Read 3 Binary Files'' to load the [[.world]], [[.worldcollision]] and [[.animinstances]] | + | To view the on-wall deployment of an existing settlement in [[IWTE]], ''Read 3 Binary Files'' to load the [[.world]], [[.worldcollision]], and [[.animinstances]]. Go to the ''Views'' tab, and select ''View World - 2d'', ''View Table Blocks - 2d'', ''View Links/Ladders - 2d'', and ''View door points'' |
[[File:On wall deployment M2TW.jpg|400px|View of deployment and links in IWTE]] | [[File:On wall deployment M2TW.jpg|400px|View of deployment and links in IWTE]] | ||
| − | Note: | + | Note: In that screen, the on-wall deployment is referred to as 'table blocks' (from the initial decoding of the file structure!) - the 'deployment' mentioned there is the Deployment Outline which limits the area the defending troops can initially deploy into. |
==Requirements for a Functioning Deployment Block== | ==Requirements for a Functioning Deployment Block== | ||
| Line 26: | Line 26: | ||
The attacking AI will only attack one breachable element per block, e.g. if you have three wall breaches under the same block it will only attack/climb one regardless of how much artillery, or how many ladders it has. If you have a gate and wall elements under the same block it will only attempt to use the gate and not attack the walls. | The attacking AI will only attack one breachable element per block, e.g. if you have three wall breaches under the same block it will only attack/climb one regardless of how much artillery, or how many ladders it has. If you have a gate and wall elements under the same block it will only attempt to use the gate and not attack the walls. | ||
| − | + | For the AI to choose to defend on a deployment block the objects within it need to be assigned to a 'perimeter'. | |
| + | ==Adding a Deployment Block and Access with IWTE== | ||
| + | ===Adding the Deployment Block=== | ||
| + | Note the object number of one of the objects you want in the block. If you don't know the object number trigger ''Assign Perimeters'' from the ''Gameobjects'' tab, the 2d view will then show you the settlement plan with the object numbers displayed, note the number and ''Cancel'' out of the screen. | ||
| + | *Go to ''Paths'' tab. | ||
| + | *Select ''Add deployment block'' | ||
| + | *Scroll through the ''Objects'' window and select the object number you want to start with. | ||
| + | *Click ''Add selected object'' | ||
| + | *Click the drop-down under ''Confirm height selected'' and check you have the correct height selected, this menu shows all the possible flat horizontal levels within the object, for standard stone walls you'll want the lowest of the three options, the others are the battlement surfaces. If you're using a complex new model, note the height of your desired plane from the model. | ||
| + | [[File:Add deployment block M2TW.jpg|400px|Adding deployment block in IWTE]] | ||
| + | *Click ''Confirm height selected'' | ||
| + | * You'll now have that object and any other objects that share the same height shown in the 2d view: | ||
| + | [[File:Adding adjacent objects M2TW.jpg|400px|Adding objects to the deployment block]] | ||
| + | *Select an ADJACENT object you want to add, and click ''Add selected object'' | ||
| + | *Repeat until you have selected all the objects you want in the block, note they must be attached at the same height. | ||
| + | *When you've added all the objects you need click ''Set edge types'' | ||
| + | [[File:Set edge types M2TW.jpg|400px|Setting edge types for the deployment block]] | ||
| + | *The diagram will change to show the edges, box select the edges and click the relevant button. For a normal wall you'll want 'front' the default by the battlements, 'back' on the other long edge and 'side' at the ends. | ||
| + | *When done click ''Accept edge types'' | ||
| + | *Now click the ''OK'' button - IWTE will then calculate the deployment, this may take a while for complicated shapes... | ||
| + | *When it's finished you'll get a diagram that shows the orange blobs where the soldiers will try and stand, these are directional and will be laid out according to your choice of front/back/side edges. If you've got that wrong you can use 'Change deployment block' to change the edge settings. | ||
| + | |||
| + | ===Add Doors=== | ||
| + | You now need to add a deployment block door to your new block, or nothing will be able to use it! Still on ''Paths'' tab: | ||
| + | *Click ''Add deployment block door'' | ||
| + | *Select your deployment block, either by clicking it in the 2d view, or by selecting from the drop-down showing the numbers | ||
| + | *Click ''Confirm block selected'' | ||
| + | [[File:Adding door to block M2TW.jpg|400px|Adding deployment block door]] | ||
| + | *In the 2d view drag the door to the desired position - note this must be within the block! | ||
| + | *In the ''Main Processes'' window use the direction indicator to turn it to required facing | ||
| + | *Click ''OK'' when done. | ||
| + | To add a Ground Level Door | ||
| + | *Click ''Add Ground level door'' button | ||
| + | *A 2d view will appear, drag the door to the required position which should be clear of any blocked pathfinding | ||
| + | *Use the direction indicator to rotate it as required | ||
| + | *Set the height value to match the ground height at that point | ||
| + | *If you don't know the height, open the [[.worldterrain]], use the ''Image file editing - various'' button in the toolbar, then ''World Files'' then ''*.worldterrain'' | ||
| + | [[File:Open worldterrain M2TW.jpg|400px|Opening the .worldterrain file to view heights]] | ||
| + | *That will take you to the ''Painter Process'' tab | ||
| + | *Click the ''Edit'' button on the first row, the one with ''type'' ''WTheight'' | ||
| + | *Navigate to your new door position and note the height shown | ||
| + | *''Exit'' out of that screen | ||
| + | *Enter the value in ''Height value:'', click enter, and click ''OK'' | ||
| + | If you don't add a link to it immediately after this step your ground door will not be saved! | ||
| + | |||
| + | ===Add Links=== | ||
| + | Still in ''Paths'' tab: | ||
| + | *Click ''Add link/ladder path'' | ||
| + | *You'll see all possible doors in the 2d View, if it helps to find your door, go to ''Views'' tab and ''View world - 2d'' | ||
| + | *Select your first door, click ''select door start'' | ||
| + | *Select your second door, click ''select door end'' | ||
| + | *You can drag the change point locations around on the 2d screen | ||
| + | [[File:Adding link ladder path M2TW.jpg|400px|Adding a link/ladder path]] | ||
| + | *''Switch to path selection'' if you want to add an additional change point | ||
| + | *The change points are normally used to try to hide the troop movement on the link/ladders inside structures, as the battle animations and spacings are not applied properly by the engine whilst the troops are on them. You can however opt to have them visible and try and set the points to follow steps etc. | ||
| + | *Click ''OK'' when done. | ||
| + | |||
| + | Don't forget to '''Save 3 Binary Files''' to save your changes!!!! | ||
| + | |||
| + | ==See also== | ||
| + | *[https://www.twcenter.net/forums/showthread.php?810216-Adding-on-wall-deployment&p=16005677#post16005677 Discussion thread for this tutorial] | ||
[[Category:M2TW Battle Map Modding]] | [[Category:M2TW Battle Map Modding]] | ||
| + | [[Category:M2TW Modding Tutorials]] | ||
Latest revision as of 05:35, 17 May 2024
In siege battles in Medieval II: Total War, infantry can stand and fight on the flat wall surfaces around the perimeter of most settlements, forts, and castles. This article explains the mechanics of this process and how to add your own on-wall deployment blocks with IWTE.
To date, only infantry units can be deployed on walls. Mods that purport to have artillery on walls have achieved the effect by having wide blocks of terrain hidden under a superficial 'wall' structure.
Contents
View Existing Deployment
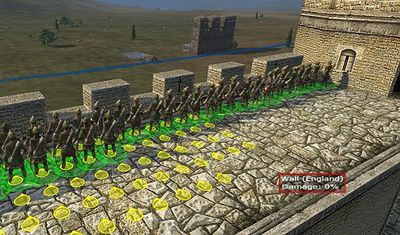
In game when you deploy or give move orders to troops on a wall you will see small yellow symbols which represent where each soldier will stand and the direction they will stand.
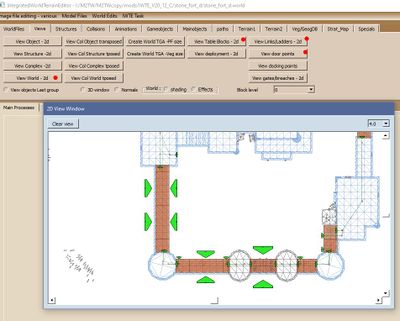
To view the on-wall deployment of an existing settlement in IWTE, Read 3 Binary Files to load the .world, .worldcollision, and .animinstances. Go to the Views tab, and select View World - 2d, View Table Blocks - 2d, View Links/Ladders - 2d, and View door points
Note: In that screen, the on-wall deployment is referred to as 'table blocks' (from the initial decoding of the file structure!) - the 'deployment' mentioned there is the Deployment Outline which limits the area the defending troops can initially deploy into.
Requirements for a Functioning Deployment Block
For a new block to be added in IWTE the objects must share a flat horizontal surface within a very limited tolerance of minor height variation.
For the block to be useable in-game the objects should have collision volumes, and the block must have at least one 'door point' with a 'link/ladder' connection, either directly to a 'ground level door' or to another block that has such a connection.
For the AI to favour standing on an on-wall block that has a reachable wall within it, there must be door points either side of the breach, so it can retreat to either side if the wall is attacked with artillery.
The attacking AI will only attack one breachable element per block, e.g. if you have three wall breaches under the same block it will only attack/climb one regardless of how much artillery, or how many ladders it has. If you have a gate and wall elements under the same block it will only attempt to use the gate and not attack the walls.
For the AI to choose to defend on a deployment block the objects within it need to be assigned to a 'perimeter'.
Adding a Deployment Block and Access with IWTE
Adding the Deployment Block
Note the object number of one of the objects you want in the block. If you don't know the object number trigger Assign Perimeters from the Gameobjects tab, the 2d view will then show you the settlement plan with the object numbers displayed, note the number and Cancel out of the screen.
- Go to Paths tab.
- Select Add deployment block
- Scroll through the Objects window and select the object number you want to start with.
- Click Add selected object
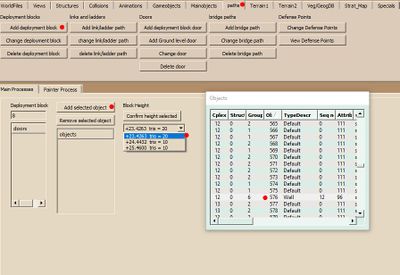
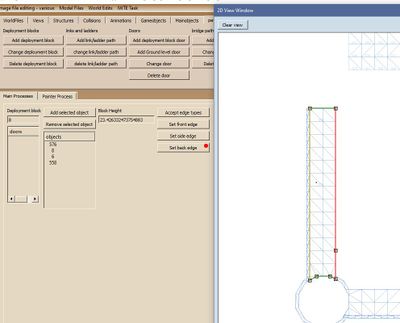
- Click the drop-down under Confirm height selected and check you have the correct height selected, this menu shows all the possible flat horizontal levels within the object, for standard stone walls you'll want the lowest of the three options, the others are the battlement surfaces. If you're using a complex new model, note the height of your desired plane from the model.
- Click Confirm height selected
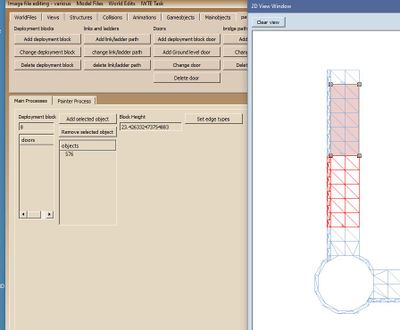
- You'll now have that object and any other objects that share the same height shown in the 2d view:
- Select an ADJACENT object you want to add, and click Add selected object
- Repeat until you have selected all the objects you want in the block, note they must be attached at the same height.
- When you've added all the objects you need click Set edge types
- The diagram will change to show the edges, box select the edges and click the relevant button. For a normal wall you'll want 'front' the default by the battlements, 'back' on the other long edge and 'side' at the ends.
- When done click Accept edge types
- Now click the OK button - IWTE will then calculate the deployment, this may take a while for complicated shapes...
- When it's finished you'll get a diagram that shows the orange blobs where the soldiers will try and stand, these are directional and will be laid out according to your choice of front/back/side edges. If you've got that wrong you can use 'Change deployment block' to change the edge settings.
Add Doors
You now need to add a deployment block door to your new block, or nothing will be able to use it! Still on Paths tab:
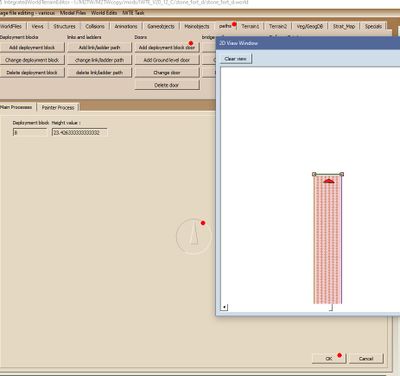
- Click Add deployment block door
- Select your deployment block, either by clicking it in the 2d view, or by selecting from the drop-down showing the numbers
- Click Confirm block selected
- In the 2d view drag the door to the desired position - note this must be within the block!
- In the Main Processes window use the direction indicator to turn it to required facing
- Click OK when done.
To add a Ground Level Door
- Click Add Ground level door button
- A 2d view will appear, drag the door to the required position which should be clear of any blocked pathfinding
- Use the direction indicator to rotate it as required
- Set the height value to match the ground height at that point
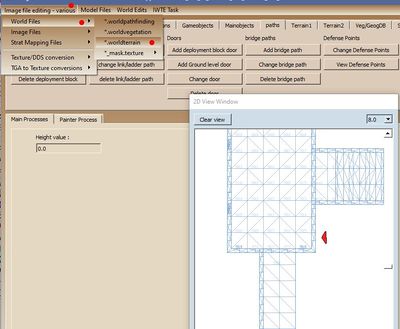
- If you don't know the height, open the .worldterrain, use the Image file editing - various button in the toolbar, then World Files then *.worldterrain
- That will take you to the Painter Process tab
- Click the Edit button on the first row, the one with type WTheight
- Navigate to your new door position and note the height shown
- Exit out of that screen
- Enter the value in Height value:, click enter, and click OK
If you don't add a link to it immediately after this step your ground door will not be saved!
Add Links
Still in Paths tab:
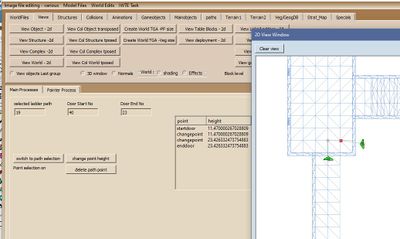
- Click Add link/ladder path
- You'll see all possible doors in the 2d View, if it helps to find your door, go to Views tab and View world - 2d
- Select your first door, click select door start
- Select your second door, click select door end
- You can drag the change point locations around on the 2d screen
- Switch to path selection if you want to add an additional change point
- The change points are normally used to try to hide the troop movement on the link/ladders inside structures, as the battle animations and spacings are not applied properly by the engine whilst the troops are on them. You can however opt to have them visible and try and set the points to follow steps etc.
- Click OK when done.
Don't forget to Save 3 Binary Files to save your changes!!!!

