Difference between revisions of "IWTE - Settlements in Blender"
(external links added) |
|||
| Line 110: | Line 110: | ||
You can now if you wish revise just part of a worldterrain. To do this delete the vertexes you don't want to update before exporting from Collada. You can use this partial update function to shunt a section of terrain values sideways/backwards/forwards - be careful to only move sections of terrain by 8m multiples so the verts stay aligned to grid positions. | You can now if you wish revise just part of a worldterrain. To do this delete the vertexes you don't want to update before exporting from Collada. You can use this partial update function to shunt a section of terrain values sideways/backwards/forwards - be careful to only move sections of terrain by 8m multiples so the verts stay aligned to grid positions. | ||
| + | ==External Links== | ||
| + | * [https://www.blender.org/ Blender] | ||
| + | * [https://www.twcenter.net/forums/downloads.php?do=file&id=2741 IWTE Download] | ||
| + | * [https://www.twcenter.net/forums/forumdisplay.php?2047-The-IWTE-Project Discussion Forum] | ||
[[Category:M2TW Battle Map Modding]] | [[Category:M2TW Battle Map Modding]] | ||
[[Category:Blender]] | [[Category:Blender]] | ||
Revision as of 06:14, 29 March 2021
Tips and instructions for working with M2TW battle map buildings via IWTE and Blender 2.8 using the .dae format - July 2020 version onwards.
The .dae files used for the Collada import/export can also be used with 3ds Max, however, max users absolutely have to use the OpenCollada plugin and file format when importing/exporting files, max comes with the AutodeskCollada file format by default which neither imports nor exports files from the game correctly.
- For information on Settlement Animations see Building Animations - M2TW
- For information on working on RTW and M2TW Units or Characters in Blender see IWTE - Units in Blender
- For general tips on working with Blender see Blender hints and tips
Contents
Export and Import
The .world contents are exported using .dae format which can be opened by 'Import Collada' in Blender as standard. To return your changes to IWTE use the Export Collada (.dae) option in Blender.
.dae files can also be imported into 3dsmax but the IWTE team are not directly supporting use in max. Some functions such as naming conventions for textures and animation groups may not work in Max and may require you to post-process files via Blender.
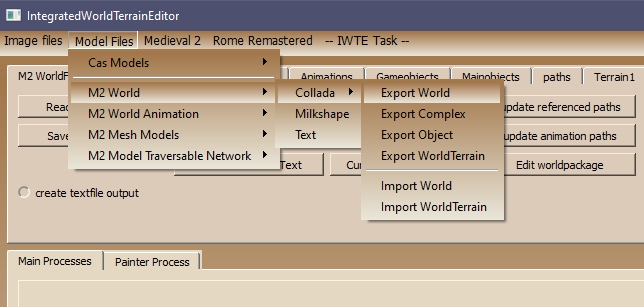
The export/import menu for Collada is accessed as shown below. To export M2TW .world assets load the 3 binaries first and use one of the export options. For import load (or keep loaded) the same 3 binaries and use the import button. Please, try not to change too many things at one time!
If you delete some objects from a complex in Blender and re-load the file in IWTE those objects will be deleted. If you delete ALL the objects from a complex IWTE will assume you did not want to amend that complex and will not delete the objects. To delete all the objects in a complex use the original 'Delete Complex' button on the structures tab.
If you leave the group names unchanged IWTE will assume they are meant to be the same objects and will retain all previous collision/effects/perimeter/main-object type information for them.
Additional new objects should be children of a box with Complex and a number in the name. If you end up with two Complex parents with the same first number, e.g. Complex 7 and Complex 7.001 (due to Blender's auto re-naming of copies) all the contents will end up in the same Complex.
If the end result of your edits has assigned objects to Complexes that aren't geographically related to them use the 'Reset Complex Blocks' button under 'World Edits' to reset things into CA style strict complex positioning.
You will need to 'Save 3 Binary Files' to save your changes after importing items via Collada.
Collada Export Settings
Default settings should do most things, but there are a few points to watch:
Under 'Anim' make sure you are on 'Matrix' and not 'Decomposed'.
If you're trying to export an animation that doesn't actually move, like a base or idle pose, in the export settings for 'Anim' you need 'All keyed curves' selected.
'Geometry' should have 'Triangulate' selected, but ideally you will already have made sure the mesh is triangulated so you can deal with any issues generated!
Try and save regularly as a Blend file which will retain all your settings, in case you manage to export via Collada with settings that don't record all the necessary information!
Viewing and Selecting Objects
When you first load the .dae file in Blender you will see mainly large simple boxes, these are the parent container boxes for the complexes, the size is for illustration only and not important.
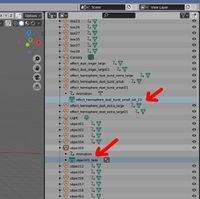
To hide them all from view hold down shift and select all the Complex top level boxes in the right hand panel, hit 'h' for hide. You will then be able to see the recognisable structure of the .world, if you select an object in the main window a dark box will appear around the orange triangle showing the number of objects/meshes next to the complex name in the right hand pane, see 'Complex 10' in the below pic:
You can then open the tree for that complex to see which object it was and how many groups are included in that object.
Heirachy System
World objects are exported as 'children' with a notional box representing the complex acting as 'parent'. To clear the view of the parent boxes in Blender, hold shift and select all the complexes in the Outliner. Hover mouse over main screen and press Ctrl I to select inverse, and Shift H to hide unselected.
World objects with multiple groups are exported with the Group0 as the parent for any subsequent groups. To create new multi-group objects follow the same procedure and make the undamaged version the parent.
World structures are not presented separately. They are reformed on import back to the .world by separating the objects that use the same texture within a complex into the separate structures.
Changing Parent Structure
To remove a group from its parent, select in main window, right click to get parent menu and 'clear parent' - you'll need to use the 'keep transform' option to avoid the group/s moving to a position relative to 0,0,0 instead of the parent's center.
To add a group/groups to a parent select the children first, and the intended parent last (holding down Ctrl to allow multi-selection) then in main window ctrl P to open parent dialogue, select "object" option.
For IWTE to recognise multiple sub groups correctly please also use _g1 _g2 etc in the name.
If the mesh you want to add as a child to another object is already in a hierarchy structure, you need to use 'Parent', 'Clear and Keep Transformation' first on the child to be, otherwise, when you parent it to it's new g0 level object it will lose the original transformation and move.
Vertex Coloring
Vertex coloring is used to set the vertex shading that appears in-game, replacing the light/dark bone weighting bodge used in Milkshape.
To view the vertex coloring for the whole scene in Blender go to shading section and 'add' 'input' 'vertex color' box - 'add' 'color' 'MixRGB' - connect color from dds to Color1 on mix box - connect color from Vertex Color to Color2 on mix box - connect output color from mix box to the Principled BSDF box.
To view and set shading for a single group switch to plain shaded view (not textured) select object group in 'object mode' switch to 'vertex paint' mode. The vertex paint mode only works on the pre-selected object group, selecting a different object from the drop-down menu will take you back to 'object mode'. Please use greyscale for shading. Unfortunately, Blender does not provide a mode where you can change the vertex shading of more than one group at a time! This makes it difficult to set the same shading across multiple objects...
Please note that currently if you need to reset effect lighting with IWTE it will also reset any custom shading you have applied :(
Useful Shortcuts (Blender Defaults)
- Select Inverse - Ctrl I
- Select All - A
- Select Children - Ctrl G
- Hide Unselected - Shift H
- Hide Selected - H
- Unhide All - Alt H
- Parent Dialogue - Ctrl P
- Change mode, i.e. Object>Edit - Tab
- Align selected vertexes vertically - S Z 0 (Scale, Z-axis, to zero)
- Insert Keyframe Dialog - I
Naming for Animations
- see main article Building Animations - M2TW
If you changed animations via milkshape previously you'll be aware that some things needed to go in comments, Blender/Collada doesn't allow group comments! So instead name the MESH groups in Blender as follows:
For an effect start with effect_ then the exact set name including the _set then _time that's time in 10ths of a second so 23 = a 2.3 seconds start time.
For objects you want to fade add _fade to the end of the mesh name.
World Terrain
Is now exportable/importable via Collada for editing in Blender/Max, this removes the old vert limit that applied for manually adjusting heights in milkshape. Please note that the terrain is not really a model it's a representation of a grid of height values on an 8m x 8m grid. Be careful not to accidentally move vertexes sideways!
You can now if you wish revise just part of a worldterrain. To do this delete the vertexes you don't want to update before exporting from Collada. You can use this partial update function to shunt a section of terrain values sideways/backwards/forwards - be careful to only move sections of terrain by 8m multiples so the verts stay aligned to grid positions.


