IWTE - Rome Remastered Functions
| IWTE |
|---|
Useful Reference: |
Article about IWTE functions used for Total War: Rome Remastered - Modding for version IWTE_v21_07_A onwards, and Rome Remastered from version 2.0.2 onwards.
*IWTE download here - please use the latest version, early versions do not have this functionality.
Contents
- 1 Campaign Mesh Generation
- 2 Unit Models (including 2 bone weighting)
- 3 Packed Skeletons and Animations
- 4 Texture Conversion
- 5 Cas conversion
- 6 Building .item to .cas
- 7 Settlement Plan Editing
Campaign Mesh Generation
IWTE will now produce .cas components and textures for a Rome Remastered campaign map mesh, please download the latest version. An example mod showing the BI vanilla map with regenerated mesh and textures can be found on Steam here.
The basic textures, task files and folder structure set-up made to create that map mesh can be found here
To utilise the batch .tga to .dds conversion task files included in the above set-up folder, download the texconv tool found here and place the .exe in the same folder as IWTE.exe
Kirsi, who has been creating some very nice maps using IWTE has published a guide here
Alternative methods of generating a mesh are possible, including Feral's tool for sectioning and converting a mesh created in Blender see here
Details of the components required and where they should be placed can be found in Creating New Campaign Map in Rome Remastered
Simple Method for Vanilla Style Textures
From IWTE_v24_08_A onwards you can create a mesh and all other necessary components using inbuilt default 'vanilla style' textures.
Launch IWTE, got to the Rome Remastered tab at the top, select RR Strat Map. You will be asked for the folder where your map tgas are located, navigate to that folder and select it. Required files are:
- map_heights.tga
- map_ground_types.tga
- map_climates.tga
- map_features.tga
- map_regions.tga
- map_snow.tga (if you want snow applied to your winter textures)
- map_heights_lakes.tga (optional if you want lakes shown on the mesh higher than sea level and without surf)
You will then be asked to navigate to your required output folder. If you use the correctly named folder at:
- your_mod/data/terrain/campaign/campaign_name
then the output files will be ready to use in game. If you use an output folder with a name other than the campaign_name you wish to use you will need to change the descr_map_coastlines.txt and descr_map_tiles.txt that IWTE has generated.
Conversion of .tga files to .dds
If you have the texconv.exe file (supplied) in the same folder as the IWTE.exe it will be used to convert the .tga files to the required .dds format as they are produced and the tga files will be deleted. The texconv.exe prints a long text message to the command window each time it runs, if your computer runs IWTE in multiple threads the messages can overlap resulting in mangled messages in the command window, this is nothing to worry about!
If you want to retain tga files to convert later simply remove/rename the texconv.exe from the folder.
Winter Textures
Snow is applied to the winter texture using the white/grey values in map_snow.tga if supplied with the map files. The map_snow.tga should be the same size as map_heights.tga. A map_snow.tga is also need for use in Rome Remastered to alter the applied farming textures and should be 8bit greyscale.
Task File Launch - New Process (8/2024)
The above simple method using default textures can also be launched using a task file with ID create_map_pieces_v2, a basic task file will be created for you in IWTE tasks when you run the above process from the RR Strat Map button, as per example below:
<task_id>                                  create_map_pieces_v2                                                 #
<directory_in>                             "J:/RRMods/My Mods/MM/data/world/maps/base"                          #
<directory_out>                            "J:/RRMods/My Mods/MM/data/terrain/campaign/imperial_campaign"       #
<directory_out_increment>                  no                                                                   #
<map_pieces_longest_dimension>             13                            # number of tiles in that dimension to produce
if you wish to try a different number of tiles to the longest_dimension number chosen by default you can change it here and run the map process from the task file.
Changing Textures
IWTE uses an inbuilt set of textures and an inbuilt default list, a copy of the default list is available here.
If you wish to use the inbuilt textures but apply them to different climates you can make an ammended and renamed version of that file and call if from your task file using this tag:
<strat_map_texture_descr> "C:\folder_name\folder_name\file_name.txt"
The default texture list includes the setup for varying textures by height, the height zones can only be adjusted in the climate_default section. The two values given represent the merge zone, the first is where the zone starts to fade in, the second where the zone is applied at 100%, till meeting the next zone.
The default texture list also shows a variety of extra ground types which are applied by IWTE according to location or steepness, eg. the shore_gt, mountains_high_ridge, mountains_high_steep etc.
Textures included in IWTE are referenced by starting \iwtepack\. You can opt to use these for different climates, e.g within climate sub_arctic you could use
fertility_low \iwtepack\iwte_rr_semi_arid.tga \iwtepack\iwte_rr_semi_arid_fertility_bump.tga
if you wanted to use your own textures you should set up a subfolder in the IWTE directory and call the files using
fertility_low \subfolder_name\texture_name.tga \subfolder_name\texture_bump_name.tga
the bump file section can be omitted if not required, bump files are not recommended for textures on high/steep areas as IWTE will apply an inbuilt erosion effect to those areas.
You can also change the map files that are used as the basis of the mesh by adding individual tags to the task file, e.g
<map_climates_tga> "J:/RRMods/My Mods/MM/data/world/maps/base/map_climates_for_mesh.tga"
This can be useful if you wish to give IWTE different map tga files from those used in game. For example IWTE will allow several dummy climates that can be useful if you need to incorporate more variety in the strat map. NB: additional/dummy climates can not be used in game.
Possible dummy climates are limited to:
dummy_white   255, 255, 255
dummy_green   0, 255, 0
dummy_blue    0, 0, 255
dummy_yellow  255, 255, 0
dummy_cyan    0, 255,255
dummy_magenta 255, 0, 255
dummy_navy 0,0,128
dummy_grey 128,128,128
dummy_purple 128,0,128
dummy_silver 192,192,192
Task File Launch - Original Version
NOTE: The original version of mesh/texture generation is launched by a task file with:
- <task_id> create_map_pieces
The task file allows certain components to be switched on or off. If you have a very large/complex mod you may find certain components exceed the 65K limit that can be written to a single .cas, if so you can turn off generation of the problem element e.g. coastline, to get the other components out.
Textures are currently generated as 2048x2048 .tga files. These will need to be converted to .dds files for use in game, we recommend NOT including mip-maps for the Albedo textures to avoid blurring at lower in-game graphics settings.
A full task file for mesh, components and texture generation is shown below, obviously change the paths to where your files are located! Anything after # is a comment:
<task_id>                             create_map_pieces

<directory_out>                      "C:\IWTE\MapMesh\output"        #directory where all created files be put
<directory_out_increment>             no                             #yes or no whether to increment the directory name (default is yes to prevent accidental overwriting)

#switch options Please note texttures take a long time to create and will take a lot of memory.
<map_pieces_longest_dimension>        13                #at the moment square tiles only will be produced so the number of tiles on short dimension will be automatically calculated
<create_albedo_textures>        yes                     #albedo textures are to be produced.. Warning, slow takes several minutes.
<create_normal_textures>        yes                     #normal textures are to be produced.. Warning, slow takes several minutes.
<create_full_dae>               yes                     #dae file for reference only (can be imported in Blender).
<create_river_mesh_cas>         yes                     #create the river mesh cas file
<create_coastline_cas>          yes                     #create coastline cas file
<create_pieces_cas>             yes                     #create piece cas files

<texture_normal_factor>          0.35             #higher value increases impact of texture normals
<normals_multiplier>             15               #higher value increases normals intensity
<tint_factor>                    0.10              #0 to 1 ratio for tints v textures
<tga_ht_scale>                   1.0              #relative scale of TGA at 0 to 255 (allowed values 0.25 to 2.5)
<mtn_ht_factor>                  0.7              #multiplier 0.0 to 5.0 - increases mountain heights in mesh
<mtnhigh_ht>                     90.0            #height texture applied - make 500 plus if you don't want this used
<mtnpeak_ht>                     130.0            #height texture applied - make 500 plus if you don't want this used
<ridge_ht>                       110.0             #height applied
<ridge_ht_factor>                1.2              #multiplier 0.0 to 5.0
<direction_gt_list>              4 5 6 7          #sequence is as per the ground type list below (starting zero) ie 4 = mountain_high - textures for thse ground types will be rotated
<sea_drop_list>  4 2 1                             # sea drop for seas shallow, deep, ocean (value  of 5 is similar to TGA pixel difference of 5 in heights_tga)
<drop_loop_factor>                      120         # used to calculate itterations in sea drop

#Main map files to use.
<map_heights_tga>                    "C:\IWTE\MapMesh\map-files\map_heights.tga"
<map_regions_tga>                    "C:\IWTE\MapMesh\map-files\map_regions.tga"
<map_ground_types_tga>               "C:\IWTE\MapMesh\map-files\map_ground_types.tga"
<map_climates_tga>                   "C:\IWTE\MapMesh\map-files\map_climates.tga"
<map_features_tga>                   "C:\IWTE\MapMesh\map-files\map_features.tga"
#<map_heights_lakes_tga>             "C:\IWTE\MapMesh\map-files\map_lakes.tga"      #optional additional file to define sea areas as raised lakes

#default groundtype TGAs
<default_fertility_low>                "C:\IWTE\MapMesh\base-textures\default_climate\fertility_low.tga"
<default_fertility_medium>             "C:\IWTE\MapMesh\base-textures\default_climate\fertility_medium.tga"
<default_fertility_high>               "C:\IWTE\MapMesh\base-textures\default_climate\fertility_high.tga"
<default_wilderness>                 "C:\IWTE\MapMesh\base-textures\default_climate\wilderness.tga"
<default_mountains_high>             "C:\IWTE\MapMesh\base-textures\default_climate\mountains_high.tga"
<default_mountains_low>              "C:\IWTE\MapMesh\base-textures\default_climate\mountains_low.tga"
<default_hills>                      "C:\IWTE\MapMesh\base-textures\default_climate\hills.tga"
<default_forest_dense>               "C:\IWTE\MapMesh\base-textures\default_climate\forest_dense.tga"
<default_forest_sparse>              "C:\IWTE\MapMesh\base-textures\default_climate\forest_sparse.tga"
<default_swamp>                      "C:\IWTE\MapMesh\base-textures\default_climate\swamp.tga"
<default_ocean>                      "C:\IWTE\MapMesh\base-textures\default_climate\sea.tga"
<default_sea_deep>                   "C:\IWTE\MapMesh\base-textures\default_climate\sea.tga"
<default_sea_shallow>                "C:\IWTE\MapMesh\base-textures\default_climate\sea.tga"
<default_beach>                      "C:\IWTE\MapMesh\base-textures\default_climate\beach.tga"
<default_cliff>                      "C:\IWTE\MapMesh\base-textures\default_climate\cliff.tga"
<default_mtnhigh>                    "C:\IWTE\MapMesh\base-textures\default_climate\mtnhigh.tga"
<default_mtnpeak>                    "C:\IWTE\MapMesh\base-textures\default_climate\mtnpeak.tga"

#directory paths containing the TGA data for each climate missing ones will use default - names within the diectory must match default names in the tags above
<mediterranean_gt_dir>                       "C:\IWTE\MapMesh\base-textures\med"			#236 0 140
<sandy_desert_gt_dir>                        "C:\IWTE\MapMesh\base-textures\sandy_desert"	#102 45 145
<rocky_desert_gt_dir>                        "C:\IWTE\MapMesh\base-textures\rocky_desert"	#146 39 143
<temperate_grassland_fertile_gt_dir>         "C:\IWTE\MapMesh\base-textures\fertile"		#237 20 91 (unused1 in M2)
<temperate_grassland_infertile_gt_dir>       "C:\IWTE\MapMesh\base-textures\infertile"		#237 28 36 (steppe in M2)
<temperate_forest_open_gt_dir>               "C:\IWTE\MapMesh\base-textures\open"		#242 101 34 (temperate_deciduous_forest in M2)
<temperate_forest_deep_gt_dir>               "C:\IWTE\MapMesh\base-textures\deep"		#247 148 29 (temperate_coniferous_forest in M2)
<swamp_gt_dir>                               "C:\IWTE\MapMesh\base-textures\swamp"		#255 242 0 (unused2 in M2)
<highland_gt_dir>                            "C:\IWTE\MapMesh\base-textures\highland"		#141 198 63
<alpine_gt_dir>                              "C:\IWTE\MapMesh\base-textures\alpine"		#57 181 74
<sub_arctic_gt_dir>                          "C:\IWTE\MapMesh\base-textures\arctic" 		#0 166 81
<semi_arid_gt_dir>                           "C:\IWTE\MapMesh\base-textures\semi_arid"		#0 114 188

#climate tints - choose from the combinations arid, warm_dry, warm_humid, cold_humid, polar, winter
<default_tint>                            warm_humid
<mediterranean_tint>                      warm_dry
<sandy_desert_tint>                       arid
<rocky_desert_tint>                       arid
<temperate_grassland_fertile_tint>        warm_humid
<temperate_grassland_infertile_tint>      warm_dry
<temperate_forest_open_tint>              warm_humid
<temperate_forest_deep_tint>              cold_humid
<swamp_tint>                              warm_humid
<highland_tint>                           cold_humid
<alpine_tint>                             warm_humid
<sub_arctic_tint>                         polar
<semi_arid_tint>                          warm_dry
<map_pieces_longest_dimension>
This sets the number of tiles the longest side of map_regions.tga will be split into, the number of tiles on the short dimension will be determined automatically so the tiles are square. The optimal number of pieces a map can be split into will vary with the size and shape of the map and the amount of detail, in terms of closely spaced shore lines and mountain ranges. Trying to have large mesh pieces on a complex map is likely to exceed the number of polys that can be written to one .cas file.
The vanilla map has 104 tiles in a grid of 13x8 20m squares, we've generated a mesh for the Mundus Magnus map with similar proportions to a grid of 13x8 30m squares, as that seems to work well for a default, the default value is to use 13 squares wide, and the number of squares vertically is calculated from that.
The game requires all map mesh pieces to be the same size (or it messes up the heightmap bin files), whilst they could technically be rectangular, IWTE enforces square tiles so they tie up with square dds texture files. For certain size and shape of maps this may mean you get a large border area on the right-hand side or top of the map.
Switch Options
To get a working map mesh in game you will need all the components except the full_dae. The .dae file is provided solely for information so you can view the mesh of all your .cas pieces by importing to Blender. It is unlikely to be practical to edit the mesh in one file like this, and IWTE does not provide a method for exporting changes to it back into .cas format, unless you export individual tiles to .dae and convert to .cas.
If your IWTE run falls over with a can't put ubyte type message it probably means the component it was trying to write has exceeded the 65k poly .cas limit. In this case you may want to turn off production of the offending component, e.g. coastline, while you test the other components in game and trouble-shoot.
<tint_factor>
IWTE applies a % of tint based on some pre-set tint scales that vary with the height of the mesh. This helps to blend in textures and accentuate contour lines on the map. Adjust this factor to use more or less of the tint values. The tint type to use per climate is set in the bottom section shown under #climate tints. Arid should be used for desert type schemes, the tints then get progressively greener, bluer then grey for winter (to avoid tinting snow textures)
<direction_gt_list>
IWTE will now rotate the textures used for selected ground types the default is to rotate numbers 4 5 6 7, which are, mountains_high, mountains_low, hills and forest_dense, change the reference numbers if you wish to alter this. The concept behind this is that you should use a directional texture for mountains etc, designed around base in the bottom left corner pointing to top right, but still tileable! IWTE will then rotate the texture according to the slope of the mesh to the texture 'points' towards the ridge.
<mtnhigh_ht> & <mtnpeak_ht>
These height values allow the introduction of two additional textures that override the map_ground_types based solely on height, the idea is to set them to values towards the top of your mountain heights, to change the mountain texture as the height rises. If you do not include these tags the height will default to 9999 (e.g. not appear on the map).
To set the textures that appear at these heights use the tags <default_mtnhigh> and <default_mtnpeak>, if you do not include these tags (but do have the _ht values set to appear then the texture used for the ground_types generated mountains_high will be used.
<sea_drop_list>
Optional parameter section which can vary the extent of slope in the sea_shallow, sea_deep & ocean sections. If you do not include this tag IWTE will use its default values.
<drop_loop_factor>
Optional parameter section which can vary the number of iterations of the sea drop factors described above. If you do not include this tag IWTE will use its default values. The larger the value the further the sloping section will extend, a long slope combined with a steep drop may result in you not seeing the texture as the mesh will be further 'underwater'. A larger value may also take more processing time.
Main map files to use
These should be similar to the map files your mod actually uses in data/world/maps/base or campaign.
map_regions and map_features MUST be the same size as your actual files!
map_heights, map_ground_types and map_climates can be either 2x map regions size +1 pixel (i.e. as used in game) or 4x map regions size +1 pixel - please note this is 1 pixel different from just doubling the scale of the in-game tga files! Also note there is no point using the large scale unless you are going to refine them to utilise the higher density, increasing the size without refining them will result in a worse result than letting IWTE interpolate between values.
map_heights, ground_types and climates can contain different content than your actual in game files if you want to achieve particular visual effects - don't overdo this unless you want to give your players a nasty surprise when they arrive at the battlemaps generated from the in-game files.
<map_heights_lakes_tga>
This is optional. If you wish to use the function provide a tga file with white background but greyscale (using same relative heights as map_heights.tga) over areas of sea (as defined by blue areas in the main map_heights.tga file). This will raise those areas in the mesh creation process and raise the adjoining land to suit. The water surface of the lake on the campaign map will be at the greyscale height you set, and will be formed as part of the river mesh and will not have the surf coastline applied.
Default groundtype TGAs
IWTE requires a default groundtype texture for each groundtype, you can if you wish use the same texture for everything. These will be used for the specified ground type in all climates unless an alternative texture is found in the climate folder.
<climate_gt_dir>
You need to supply a folder name for each climate's gt_dir (groundtype directory) - the folder must exist, but can be empty, you can also direct multiple climates to the same folder.
Textures within the climate groundtype directory folders must use the full correct name of the default groundtype they are meant to replace. e.g. sea_deep.tga would be needed to replace sea_deep for that climate, even if the default file is just using sea.tga or fred.tga or whatever...
Getting the files in game
Please see Creating New Campaign Map in Rome Remastered for details of the required file structure.
You will need a copy of descr_map_tiles.txt with names and paths for all the pieces and textures your map uses.
IMPORTANT: If you use the IWTE generated river_a.cas to straighten the borders where they coincide with rivers you will also need our version of descr_aerial_map_tile_models.txt in your mod/data folder. A copy of this file can be downloaded with the basic texture set-up pack here.
Unit Models (including 2 bone weighting)
See main article IWTE - Units in Blender (RTW)
The process shown for import/export of RTW units will also work for Rome Remastered, IWTE will now support the weighting of one vert to two bones throughout the body (not weapon) sections of cas models as used for the _lod0 versions of RR units. When converting a dae to cas which has weighting to two bones per vertex IWTE will also generate a _lod1.cas version which has the weighting reduced to 100% to the higher bone, this lod1 will be suitable for use in RTW, M2 strat models and for lod1 and below in RR. You should ideally also amend the model to reduce the poly count in the lower lods.
Packed Skeletons and Animations
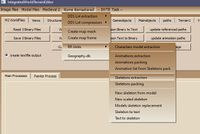
IWTE now includes functions to directly unpack and repack the RR pack.idx, pack.dat, skeltons.idx & skeletons.dat. All the related functions can be found from the Rome Remastered > RR Units > buttons, see image below.
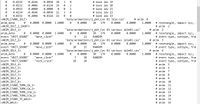
RR Skeleton to Text
IWTE will convert RR skeletons to text and back, the text file includes lines for ALL the possible animations allowing you to more easily add additional animations, for instance if all the idle variants haven't been used. PLEASE NOTE: this is for skeletons from packs already in RR format not RTW skeleton packs which have the older type of event sound mapping.
To add an entry for a previously unused animation add the path to the animation 'cas' in quotes on the same line as the animation name. Add an 'anim data' line below that (copy the standard data unless you have a specific rotation or impact required). Optionally add event lines to add sounds on lines below that.
New Skeleton from Model
This function takes an existing unpacked RR skeleton file and an existing unit .cas model with the same bone arrangement as that skeleton, and a new .cas unit model with a different bone arrangement, then creates a new skeleton and new animation set based on the new unit model. Where bone names are the same as the old model any animations applied to those bones are retained in the new animations. There is an option to add a prefix to the new animation names, it is hightly recommended that you use this to avoid confusion and accidental overwriting of orignal animations that may still be in use for other skeletons.
Texture Conversion
Some of the Remastered textures, e.g. the campaign map tile textures are compressed using LZ4 - IWTE will decompress these to readable format. Use the "Rome Remastered" button and then "DDS Extraction" button, select the folder where your compressed textures are, then select the folder you want the new ones saved to.
You can also use a task file instead of selecting folders, an example would be:
<task_id>                             rrdds_extract_to_dds_directory                           #
<directory_in>      "C:\Steam\steamapps\common\Total War ROME REMASTERED\Contents\Resources\Data\data\terrain\campaign\textures\026"
<directory_out>     "C:\RomeRemastered\textures\new026"
#<all_subdirectories> yes
#<directory_out_increment>    no                      #yes or no whether to increment the directory name (default is yes)
Remove the comment if you want to use <all_subdirectories> - note though that if files in the subdirectories have the same names they will just overwrite each other!
Cas conversion
IWTE should handle converting all RR .cas files to .dae to load via Blender's Collada interface.
Back-face culling
There is a 0 or 1 indicator at the end of each texture in the .cas files which in theory sets whether back-face culling is used for that texture in game rendering. This may be over-ruled by other game mechanics in some circumstances. By default IWTE returns .cas files with culling on as that should allow the best game performance. To turn culling off for a particular texture, in Blender, for the texture/s you want not to have culling in the MATERIAL name, if it is currently texture_name_tga, add _nocull so you have texture_name_tga_nocull as the texture name. When you export to .dae and convert back to .cas with IWTE you should get a .cas with texture_name.tga which has culling off.
Animated Cas Models
To get a .cas file that includes both the model and its animation (e.g. for models_spot) use the RTW object animation dae to cas button.
Building .item to .cas
From version 22_04_A onwards IWTE has a function to convert .item files back to the component .cas files. This function may be needed when porting or adapting old mods. The game generates .item files for buildings and wall components from .cas files and thereafter only uses the .item file, because of this many mods shipped with only the .item files and the original .cas files have been lost!
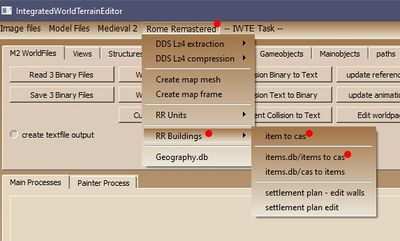
To use this function select the buttons shown from the drop down menus. For the 'items.db/items to cas' option you will then be asked to select the descr_items.db, IWTE will then convert ALL the .item files it finds that are referenced in that .db and that are found in the /items sub-folder at the same location. If you do not want ALL the .item files converted simply make a new temporary folder, copy the .db file into that and make a /items sub-folder with only the files you want. Cas files will be created in a 'to_cas' folder at the same location, with sub-folders for models_building etc, created to match the paths in the .db. As an additional fix if textures in the original cas/item did not have the .tga suffix this will be added.
To convert single .item files and/or if the related descr_items.db is not available you can use the 'item to cas' option, this will generate .cas files named with the item name and _lod0 _lod1 etc as the original input cas names are not stored in the .item.
For the reverse .cas to .item function works you need the descr_items.db file and you must supply the .cas files required for an .item listed in the .db on the correct relative path. You will not normally need to use this function as the game will regenerate .item files for you (and you will have had to let the game create the descr_items.db file anyway). The only case where it would be useful is if you are creating models_spot animated objects with skeleton style parented bones in the animation, the game does not handle creating .items from this sort of model correctly and alternate bones will have reversed rotations.
Settlement Plan Editing
From version 22_06_A onwards IWTE includes an RR settlement plan editor. The settlement plans are a text file base system which gives the coordinates and rotation of various items including the walls.
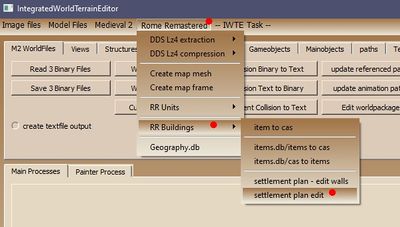
To activate the function for a full settlement or ambient plan use 'settlement plan edit'. The 'settlement plan - edit walls' function provides a simpler option which solely loads the wall outline.
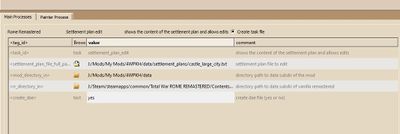
After selecting 'settlement plan edit' you will need to browse to find the text plan you want to edit, the mod's data folder and the main data folder. By default a dae file will not be produced, change the no to yes if you wish to edit the settlement in 3d in Blender.
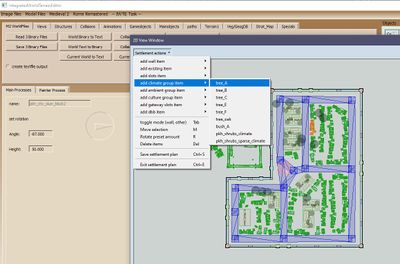
When the settlement has loaded you can edit it in the 2d window. As walls follow different rules from the normal items you need to toggle between modes to chose which to edit, use Tab for this. Wall items can be moved at any time whilst in wall mode by selecting and dragging, they can be rotated solely by pressing R which will rotate through the allowable options. Wall items snap to grid in the allowed positions. IWTE does not sanity check your wall layout you will need to check visually that the walls link properly!
Other items can be moved by selecting them, singularly or by dragging a box around multiples, then pressing M, pressing your cursor back over the selected item/s and dragging. These items can be rotated when selected singularly either be pressing R and then dragging the arrow part shown over the item, or by use of the rotation arrow/angle box in the 'Main Processes' window. The height of items can also be adjusted by entry in the 'Height' box and pressing enter.
Saving your settlement plan will generate a text file with the suffix _new00 etc in the same folder as your original file. Rename this to replace your original file, but do not discard your original until you are happy with the result and have confirmed it works in game!
There is no undo button! Save regularly and do not discard earlier versions until you have checked the final version in game.
To edit in 3d you need to import the created .dae file into Blender - relocate the items by moving or rotating in Object Mode. Do not edit the wall positions in Blender or attempt to edit the meshes representing the floor or items any such changes will be ignored when converting the file. Export the scene to collada .dae when you are happy with it and convert the item section back into a settlement plan by using a task file as shown below, adjusting for your file names and paths.
<task_id>                                 dae_to_settlement_plan         # to read dae file and update a settlement plan
<settlement_plan_file_full_path_in>       "j:/mods/my mods/4wpkh/data/settlement_plans/castle_large_city.txt"   # settlementplan to update
<dae_file_full_path_in>                   "j:/mods/my mods/4wpkh/data/settlement_plans/anyoutfiles/castle_large_city.dae"   # dae file of settlement


